React - Create the React Project
A React project is a web application built using the React JavaScript library to create dynamic, interactive user interfaces. It is structured around components, where each component represents a part of the UI such as pages, buttons, forms, or layouts.
In a React project, developers use JSX, state, props, and hooks to manage data and user interactions efficiently. The project typically includes files for components, styles, assets, and configuration, along with a main entry point that renders the app in the browser.
React projects are commonly used to build single-page applications (SPAs), dashboards, e-commerce websites, and large-scale front-end systems because they offer high performance, reusability, and easy maintenance.
A Layout Challenge
Imagine you’ve been asked to build a simple recipe website layout using React.
You don’t need images or complicated features yet — just a clean design with a focus on text.
The layout will have these sections:
• A header navigation
• A featured recipe section
• A list of latest recipes
• A footer
Organizing Your Code
According to the React documentation, there are two common ways to structure your files:
1. Grouping by features
2. Grouping by file type
For beginners, the advice is clear: keep it simple.
For this small recipe website, create a components folder and put all your components inside it. That’s enough to stay organized without overcomplicating things.
Setting Up the Project
Let’s call this project recipe-example.
In your terminal, run:
npx create-react-app recipe-example
When it’s done, go into the src folder. You’ll see something like this:
src/
App.js
App.test.js
index.css
index.js
logo.svg
reportWebVitals.js
setupTests.js
Now, add a components folder:
src/
components/
App.js
App.test.js
index.css
index.js
logo.svg
reportWebVitals.js
setupTests.js
Inside components, create one file per section:
src/
components/
Header.js
Featured.js
Recipe1.js
Recipe2.js
Recipe3.js
Footer.js
Building Components
Here’s what each file might look like.
Header.js
function Header() {
return (
<header className=”main-header”>
<h1>My Recipe Book</h1>
<nav>
<ul>
<li>Home</li>
<li>Recipes</li>
<li>About</li>
<li>Contact</li>
</ul>
</nav>
</header>
);
}
export default Header;
Featured.js
function Featured() {
return (
<section className=”featured-recipe”>
<h2>Recipe of the Day</h2>
<p>Spaghetti Aglio e Olio — a quick, flavorful pasta with garlic, olive oil, and chili flakes.</p>
</section>
);
}
export default Featured;
Recipe1.js
function Recipe1() {
return (
<div className=”recipe-card”>
<h2>Classic Pancakes</h2>
<p>Fluffy pancakes made with simple ingredients. Perfect for breakfast!</p>
<p className=”link”>Read more…</p>
</div>
);
}
export default Recipe1;
Recipe2.js
function Recipe2() {
return (
<div className=”recipe-card”>
<h2>Vegetable Stir Fry</h2>
<p>A healthy mix of colorful vegetables sautéed with soy sauce and sesame oil.</p>
<p className=”link”>Read more…</p>
</div>
);
}
export default Recipe2;
Recipe3.js
function Recipe3() {
return (
<div className=”recipe-card”>
<h2>Chocolate Chip Cookies</h2>
<p>Crispy on the edges, chewy in the middle — a timeless favorite.</p>
<p className=”link”>Read more…</p>
</div>
);
}
export default Recipe3;
Footer.js
function Footer() {
return (
<footer className=”site-footer”>
<p>© 2025 My Recipe Book. All rights reserved.</p>
</footer>
);
}
export default Footer;
Benefits of Components
• Components keep things modular. Each recipe preview is a separate file, so you can add or remove them easily.
• JSX uses className instead of class. That’s because class is reserved in JavaScript.
• Don’t overcomplicate folder structures. For small projects, one components folder is enough.
This completes your recipe website layout.
In the next step, you’ll import these components into App.js and render the full page.
Here’s the final App.js file that imports all the components and displays the full Recipe Website Layout:
App.js
import Header from “./components/Header”;
import Featured from “./components/Featured”;
import Recipe1 from “./components/Recipe1”;
import Recipe2 from “./components/Recipe2”;
import Recipe3 from “./components/Recipe3”;
import Footer from “./components/Footer”;
function App() {
return (
<div className=”App”>
<Header />
<Featured />
<section className=”recipe-list”>
<h2>Latest Recipes</h2>
<Recipe1 />
<Recipe2 />
<Recipe3 />
</section>
<Footer />
</div>
);
}
export default App;
How This Works
1. Each component (Header, Featured, Recipe1, Recipe2, Recipe3, Footer) lives inside the components folder.
2. In App.js, we import them at the top.
3. Inside the App function, we combine them like blocks to form a complete recipe website page.
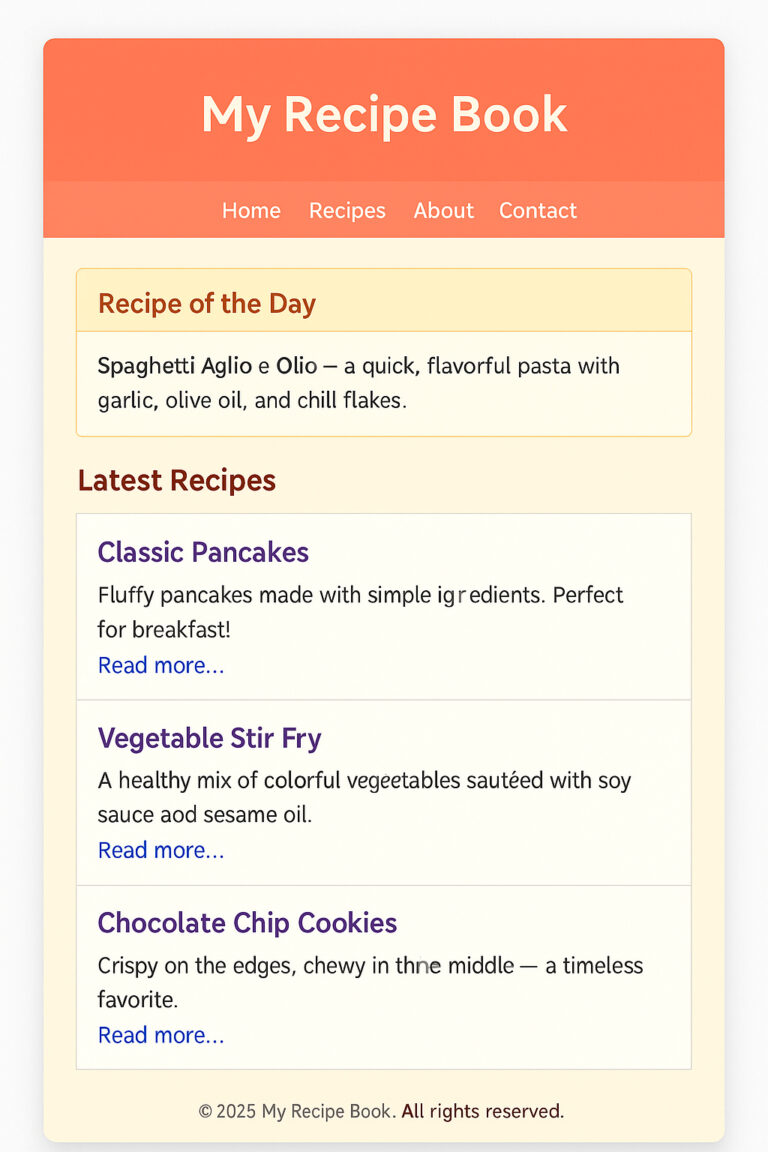
When you run the app (npm start), you’ll see:
• A header with navigation
• A featured recipe section
• Three recipe previews
• A footer
Perfect Let’s add some beginner-friendly CSS to make the Recipe Website Layout look clean and easy to read.
Here’s a simple App.css you can use:
App.css
/* Reset some default browser styles */
body, h1, h2, p, ul {
margin: 0;
padding: 0;
}
body {
font-family: Arial, sans-serif;
background-color: #fafafa;
color: #333;
line-height: 1.6;
}
/* App container */
.App {
max-width: 900px;
margin: 0 auto;
padding: 20px;
}
/* Header styles */
.main-header {
background: #ff7043;
color: white;
padding: 20px;
border-radius: 8px;
margin-bottom: 20px;
}
.main-header h1 {
margin-bottom: 10px;
}
.main-header nav ul {
list-style: none;
display: flex;
gap: 20px;
}
.main-header nav ul li {
cursor: pointer;
font-weight: bold;
}
/* Featured recipe section */
.featured-recipe {
background: #fff3e0;
border: 1px solid #ffcc80;
padding: 20px;
border-radius: 8px;
margin-bottom: 20px;
}
.featured-recipe h2 {
margin-bottom: 10px;
color: #e65100;
}
/* Recipe list */
.recipe-list {
margin-bottom: 20px;
}
.recipe-list h2 {
margin-bottom: 15px;
color: #d84315;
}
/* Recipe cards */
.recipe-card {
background: white;
border: 1px solid #ddd;
border-radius: 6px;
padding: 15px;
margin-bottom: 15px;
box-shadow: 0 2px 5px rgba(0,0,0,0.05);
}
.recipe-card h2 {
margin-bottom: 10px;
color: #6a1b9a;
}
.recipe-card .link {
color: #0288d1;
font-weight: bold;
cursor: pointer;
}
/* Footer styles */
.site-footer {
text-align: center;
padding: 15px;
background: #eeeeee;
border-radius: 6px;
font-size: 14px;
}
Where to Place It
1. Inside your src/ folder, you already have App.css.
2. Replace its content with the CSS above.
3. Make sure App.js has this line at the top:
import ‘./App.css’;
Go to the terminal and type
npm start
After this, your recipe app will look neat, with:
• A colorful header and navigation bar
• A highlighted featured recipe section
• Styled recipe cards
• A simple footer